Tuesday, April 9, 2013

Faux Copper Patina Tutorial

Here we are at Central Iowa Headquarters for Chalk Paint® decorative paint by Annie Sloan -- TLC -Vintage Collection! Today we are doing a step-by-step tutorial on a Faux Copper Patina that was chosen by our Facebook followers for this neat Asian-inspired chest.


First, most pieces are easily cleaned up for painting by using dish soap and water, then rinse and dry! Really dirty pieces, use TSP and then rinse well and dry!


First coat -- don't expect total coverage. Like Annie Sloan says, just slap it on so you can get onto the interesting bits! Depending on how you want the finished piece to look decide if you will go with the grain or not.  I paint the backs of my pieces as you never know what people will look at and here in the shop, all sides are exposed usually. I am careful with older pieces or quality pieces to leave the manufacturer and shipping labels legible -- just paint around them.


Decide what you will do with the pulls and hinges. In this case, I did not remove them as the whole thing should look like a metallic, patina finish when we are done!


Sorry, the lighting makes this look like Duck Egg on the close up -- but it is actually Florence!


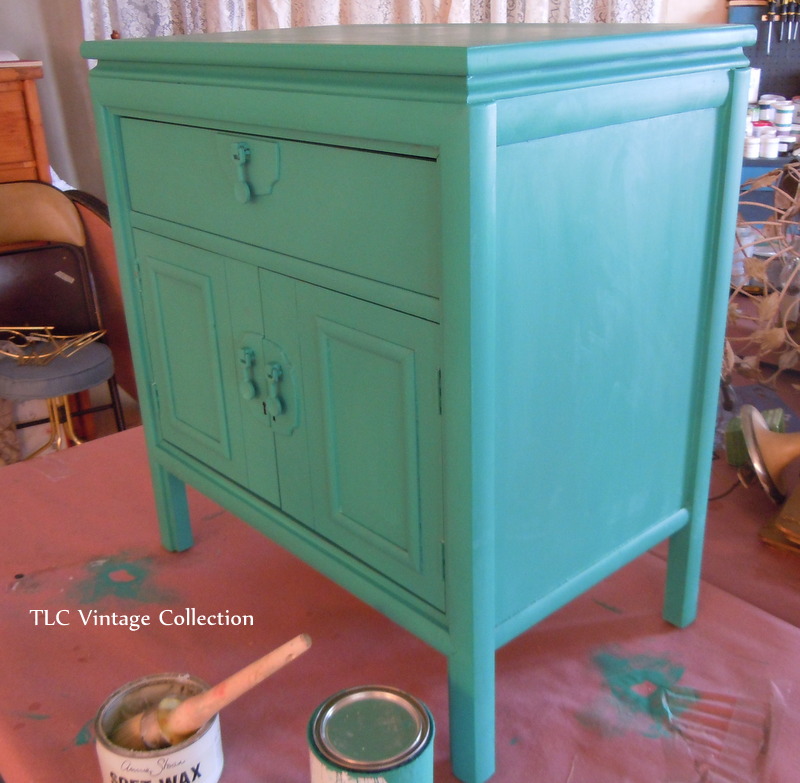
I have just done a coat of clear wax after two coats of paint all over! This project could be finished completely by now, but we do have customers coming in to talk and discuss their next projects....Now for some of the especially fun bits! Applying some Copper Gilding Wax and it takes very little! We carry seven colors of gilding wax: 3 golds, silver, pewter, brass and now copper!


Applied copper gilding wax with finger.


Sorry for the delay in finishing this post. We had internet issues yesterday. But here i the final after dark waxing! And we added a surprise pop of Emperor's Silk to the drawers and interior!


Monday, March 25, 2013

Around The Shop

Business is wild at TLC Vintage Collection, Central Iowa Headquarters for Chalk Paint® decorative paint by Annie Sloan! March has been absolutely busy every single minute. Annie wanted a photo of me for her Pinterest board called The People Who Sell My Paint (check it out!). So I asked my favorite photographer, son Chris Saldanha, to snap some shots around the shop. Here they are for you to enjoy too! And thank you everyone for helping make my little shop such a success! We celebrate one year anniversary as I fly down to New Orleans April 1 for the Chalk Paint® annual convention!


Wednesday, March 13, 2013

Pretty as You Please

At  TLC Vintage Collection here in Central Iowa, I've wanted to paint a piece of furniture like this with Chalk Paint® decorative paint by Annie Sloan. Two things made me hesitate: 1) some of the inlay is so fantastic you hate to cover it up and 2) what if I couldn't pull it off. But I think it worked just fine!


This piece is a coat of Coco all over. Then Country Grey and Duck Egg in selected areas. But we didn't start out so nice. That is why I decided to try this piece first -- it was a mess.


It had a broken caster, tons of scratches, missing hardware, chipping varnish. I went at it inside and out with STP and -- unusual for me -- did a quick light sanding to the top to get rid of any loose varnish.

I painted right over the hardware with Coco. Here is what the piece looked like after one coat Coco and then one coat each Country Grey and Duck Egg Blue in chosen parts of the design.


A coat of wax, distress, rewax and voila! Buff til your hearts content. So fun, so pretty! Picked up a couple cute knobs to give it a touch of whimsey!


Create a Life you want to Live!

Wednesday, February 27, 2013

Taking a Floor Up A Notch(es)!


We are taking the shop floor up a few notches with Chalk Paint® decorative paint by Annie Sloan® as well as Annie's Lacquer for floors! I wanted a vintage look, old and imperfect and that is what we have! I'm loving it and so do our customers.

We've only finished a little over 200 of the 1900 SF so far, but there will be other techniques in areas. The workshop/classroom floor area gets a lot of random painting, if you know what I mean -- LOL. So we may be looking at a splatter effect there so that the next time I drop an open can of paint you will hardly notice! (Yep, it does happen.)

I chose what was supposed to be a blizzard day for this project. Of course, the meteorologists were somewhat wrong and we had record weekday sales that day -- go figure! But the customers just worked their way around the misplaced furniture and tiptoed around the wet paint! Thank you all for your understanding.

First was to clean the already sealed floor. I chose to have that honey khaki color show through a rolled layer of French Linen as I wanted some dimension to the floor. This happened with darker and lighter areas of paint.


Remember those old plastic lace table cloths your grandma had. I had found one some time ago at a garage sale for a dollar or two. I've use parts of it as a stencil for a number of furniture projects, but never the entire thing. So here we go with a roller and Graphite!


I worked my way with the roller around the tablecloth. I was not concerned about even coverage or if I went over the edge. It was meant to look old and irregular. Then I overlapped just ever so little one stenciled area to the next.


I was thinking awesome. I must admit I loved how this was working out! I must warn you that after this many "circles" the tablecloth gets pretty heavy and messy with residue paint. It starts becoming sticky -- so 200 SF is about the limit or you need to rinse it off after a while. I managed to complete the whole area I had cleared for that day. Final step -- to coats of Lacquer rolled on with time to dry in between. The lacquer comes in liters and should be poured out into another container and stirred before putting into a roller pan. I used one of those oval plastic ice cream containers which works great and can be sealed up with the lid if you don't use it all!

 
You need to allow the floor to dry overnight before walking on it. I found it best to wear socks rather than shoes when applying the second coat so I didn't pull up any paint and lacquer from the first coat with my tennies. The test of this floor came over the weekend when water came into the shop from the floor above. Although water sat on parts of the floor, it held up fine. In the future I will simply clean it with a swifter! I have also painted and lacquered our wood laminate floor in our home powder room and it is working perfectly after many months!
 
This project took two quarts of French Linen, one quart of Graphite and a little over two liters of Lacquer.