These columns were not in the best shape. They were bright white, but scarred up. Pretty darn heavy -- I was told they were molded fiberglass, but if so they are the heaviest fiberglass I've ever handled. The tops were removable, but plastic. The bases were also plastic and had been caulked to the column, but most had broken lose during their salvage from a vacated beauty salon.
I asked that they be brought into my little 1890 SF retail store, not quite sure what we would do with them. We just spotted them around the shop here and there, not quite sure if we would keep or sell them, until.....a customer came in later that day and said how they added to the finished look of the store, giving a way for the eye to wonder around the shop from pillar to pillar. We decided they would stay!
We fell in love with them but they needed work. They were too stark white and there were black marks and scratches here and there. We decided they needed to look more like marble and neutral.
So here was what we needed and did for this transformation.
Supplies: A small roller tray, a small foam roller, Annie Sloan's decorative Chalk Paint® in Old White, French Linen and Paris Grey, Annie's Clear Soft Wax, a large waxing brush, a caulking gun and grey silicone caulk, an oversized stencil brush and lint free rags.
We laid our eight-foot columns out on two five-foot long tables, that would could work around.
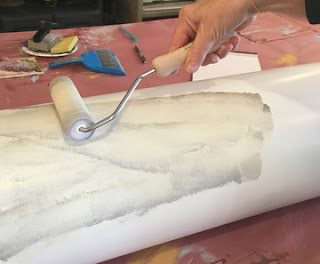
We poured equal amounts of Paris Grey to the left of our paint tray, Old White in the center and French Linen on the right. We gently rolled our roller into this three colors, keeping them as separate in the pan and on the roller as we could. We rolled off excess in the pan's riser.
We then gently rolled this onto the column, working the roller and paint around until we were happy with the look. We did the same thing with the bases and toppers, but instead used three small pools of the paint that we tamped a large stencil brush in.
When the paint was dry we finished each column with a coat of Clear Soft Wax, removing the excess with a soft lintless cloth. We used Scott Shop Rags. Finally we put each pillar in its base and caulked the joining with the grey caulk. It was not necessary to do this to the tops, making them easier to move. I am sure we will sometimes use all or some of the columns at show events where we have booths.
This technique gives a noble look to most anything -- cement, simple table tops, crockery and frames. Remember if you use this technique on outdoor items, do not wax the item. The paint will age beautiful on its own outside. Until our next blog DIY!
Thank
you for following us!
Janet at TLC Vintage


No comments:
Post a Comment